WebGL 에서 Texture 란 ?
WebGL 에서 해주는 것은 어떤 특정 pixel 이 무슨 색을 입혀서 출력해야 하는 가를 판단하고, 표현하는 것이 어쩌면 가장 주요한 일이라고 볼 수 있을 것 같습니다.
그 공간에서 하는 일이 앞에 놓인것은 출력하고, 뒤에 있는 것은 출력하지 않고, 만약 투명하다면 색을 투명도에 따라 혼합하여 보여주는 등 내부적인 일은 복잡합니다.
그래도 주어진 좌표를 기준으로 해당 위치에 어떤 색을 출력해야하는지 결정하는 일은 변하지 않습니다.
Texture 는 사용에 따라 여러 가지 일을 할 수도 있지만, 가장 본질적인 것은 특정 좌표의 색을 texture 에 기록된 값으로 보정하여 출력하는데 사용되는 것일 겁니다.
가장 일반적인 예는 특정 그림을 z 좌표를 무시 한다면, x, y 에 해당 색상을 선택하고 출력하는 역활을 담당하게 될 것입니다.
Texture 좌표
앞서 WebGL 에서의 좌표가 x : -1 ~ 1 ( 왼쪽에서 오른쪽 ), y : -1 ~ 1 ( 아래에서 위로 ), z : -1 ~ 1 ( 뒤에서 앞으로 ) 입니다. z 좌표는 스크린에 표기될 때 앞에서 뒤의
방향으로( 왼손좌표계 ) 변환되기 때문에 투영행렬에서 보정해 주고 있습니다.
Texture 좌표는 x : 0 ~ 1 ( 왼쪽에서 오른쪽으로 ), y : 0 ~ 1 ( 아래에서 위로 ) 의 좌표 공간을 갖습니다.
Fragment 가 색상을 보간하는 방식을 의미합니다. 다만, 우리가 일반적으로 사용하는 그림은 pixel 단위로 저장 되어 있습니다. pixel 은 왼쪽 상단을 시작으로 오른쪽 하단에서 종료 됩니다.
그림을 연상하신다면 (0,0) 왼쪽 상단, (1,0) 오른쪽 상단, (1, 1) ( 오른쪽 하단 ), (0,1) (왼쪽 하단) 으로 보면 좋을 것 같습니다.
처음 Texture 를 로딩 하면서 그림이 뒤집혀 있는 것을 보고 의아해 했던 기억이 납니다. 입력되는 pixel 이 보정되는 시작이 opengl 에서는 0, 0 에서 시작되기 때문에 그림이 뒤집혀 보이게 됩니다.
엄밀히 말해 공간은 좌표를 기준으로 행렬에 의해 변환 되기 때문에 위, 아래 등의 위치 개념이 적절하진 않지만, 이해를 돕기 위해 사용하였습니다.
Texture 보간
네모를 그리면서 위치 정보가 (-1,1,0), (1,1,0), (1,-1,0), (-1,-1,0) 이 있고, Texture 좌표가 (0,1),(1.1),(1,0),(0,0) 이고 그리기 위해 Index 는 반 시계 방향으로 구성해야 합니다.
(0,2,1, 0,3,1) 로 Index 가 구성되어 있다고 가정하고, 표현할 내용이 화면에 100 x 100 pixel 에 그려진다고 생각해 보겠습니다. 좌표값 사이에 있는 색상은 WebGL 의 Fragment 에서 보간 하여
화면에 출력하게 됩니다. 이때 사용하는 방식을 크게는 두개로 나누어 볼 수 있습니다. NEAREST, 혹은 LINEAR 입니다.
NEAREST 는 가장 가까운 위치의 색상을 가져오는 방식이고, LINEAR 는 주변 4개 pixel 의 값을 보간한 값을 반환합니다.
원본 이미지를 비율적으로 축소해(1/4) 비슷한 크기의 data 를 사용하기도 합니다. 이 때 사용하기 위한 정보를 mipmap 이라고 하고, 이를 미리 생성하도록 요청할 수 있습니다.
Texture Program 진행 과정
상자(Cube)를 보여주는 예에서 그림을 출력하기 위해서 평면 4개를 지닌 간단한 javasscript 평면을 구성해 보았습니다.
javascript class 로 구성된 내용입니다.
   export class BasicPlane {
      constructor(item) {
         this.positions = [
               -1.0,  1.0,  0.0,
               1.0,  1.0,  0.0,
               1.0, -1.0,  0.0,
               -1.0, -1.0,  0.0,
         ];

         this.textureCoordinates = [
               0.0,  0.0,
               1.0,  0.0,
               1.0,  1.0,
               0.0,  1.0,
         ];

         this.normals = [
               0.0,  0.0,  1.0,
               0.0,  0.0,  1.0,
               0.0,  0.0,  1.0,
               0.0,  0.0,  1.0,
         ]
         this.colors = [
               1.0,  0.0,  0.0,  1.0,    // first : red
               0.0,  1.0,  0.0,  1.0,    // second: green
               0.0,  0.0,  1.0,  1.0,    // third : blue
               1.0,  0.0,  1.0,  1.0,    // forth vertex: cyan
         ];

         this.indices = [
               0,  2,  1,      0,  3,  2,
         ];
      };

      setColors = (colors) => {
         if ( colors.length == 16 ) {
               for ( let i = 0; i < 16; i++ ) {
                  this.colors[i] = colors[i];
               }
         } else if ( colors.length == 4 ) {
               for ( let i = 0; i < 4; i++ ) {
                  for ( let j = 0; j < 4; j++ ) {
                     this.colors[i*4+j] = colors[j];
                  }
               }
         } else if ( colors.length == 3 ) {
               for ( let i = 0; i < 4; i++ ) {
                  for ( let j = 0; j < 3; j++ ) {
                     this.colors[i*4+j] = colors[j];
                  }
                  this.colors[i*4+3] = 1.0;
               }
         }
      };

      getCurrentData = () => {
         return {
               positions : this.positions,
               colors : this.colors,
               normals : this.normals,
               textures : this.textureCoordinates,
               indices : this.indices,
         };
      }
   }
조금 주의 깊게 보아야 할 부분은 좌표와 색상, 그리고 texture 위치 입니다
z 좌표가 모두 0인 평면이니, x,y 좌표만 확인해 보면 ,
Position의 좌상단(-1, 1) 의 색상은 (1,0,0)-red 이고, 우상단(1,1) 은 (0,1,0) - green , 우하단 (1, -1) 은 (0,0,1) blue, 좌하단은 (-1,-1) 은 ( 1, 0, 1) - cyan 입니다.
동일한 좌표가 textureCoordinate 에서는 (0,0) - 좌하단, (1,0) 좌상단, (1,1) 우상단, (0, 1) 좌상단 을 지칭하고 있습니다. pixel 이 보간되는 순서가 0,0 에서 시작 되기 때문에
만약 0,1 을 이미지의 왼쪽 상단을 연상하고 좌표를 구성해 놓으면, 이미지가 뒤집혀 보이는 현상이 나타나게 될 것 같습니다.
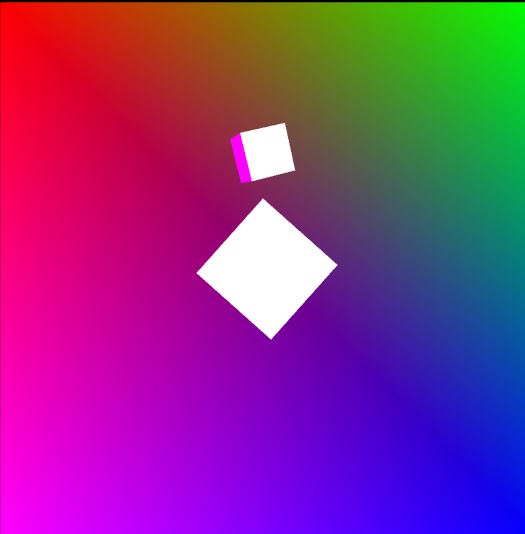
기존 Shader를 통해 구현한 화면 입니다.
아직 Texture 를 다루기 전에 사용한 내용은 이전에 사용한 Shader 와 동일한 Shader 를 사용하였습니다.
 <script type="module" defer>
     import * as TypedMatrixUtils from '../../js/TypedMatrixUtils.js';
     import * as GLUtils from '../../js/GLUtils.js';
     import * as GLDataUtils from '../../js/GLDataUtils.js';

     function render(gl,gp) {

         let delta = 0;
         let curData = 0;

         function drawScene(time) {
             time *= 0.001;
             gl.clearColor(0.0, 0.0, 0.0, 1.0);  // Clear to black, fully opaque
 		    gl.clearDepth(1.0);                 // Clear everything
 		    gl.enable(gl.DEPTH_TEST);           // Enable depth testing
 		    gl.depthFunc(gl.LEQUAL);            // Near things obscure far things

 		    // Clear the canvas before we start drawing on it.

 		    gl.clear(gl.COLOR_BUFFER_BIT | gl.DEPTH_BUFFER_BIT);

             if ( curData == 0 ) {
                 curData = time;
             } else {
                 delta = time - curData;
             }

             gp.render(gl, true);
             requestAnimationFrame(drawScene);
         };

         requestAnimationFrame(drawScene);
     }

     function setProgramUniformValues( gl,  glProgram ) {

         let worldMatrix             = TypedMatrixUtils.makeIdentityMatrix(4);
         let viewMatrix              = TypedMatrixUtils.makeIdentityMatrix(4);
         let projectionMatrix        = TypedMatrixUtils.makeIdentityMatrix(4);

         let eye = [0, 0, 10];
         let at = [0, 0, -8];
         let up = [0, 1, 0];

         //  view
         viewMatrix = TypedMatrixUtils.makeCameraMatrix3D( eye, at, up );

         //  [ 주석 4 ] : projection
         projectionMatrix = TypedMatrixUtils.makePerspectiveMatrix(90*Math.PI/180, gl.canvas.width/gl.canvas.height, 0.1, 1000);
         //projectionMatrix = TypedMatrixUtils.makeOrthographicMatrix(-30,30, -30,30, 0.1, 1000);


         glProgram.setUniformMatrix("worldMatrix",TypedMatrixUtils.makeIdentityMatrix(4));
         glProgram.setUniformMatrix("viewMatrix", viewMatrix);
         glProgram.setUniformMatrix("projectionMatrix", projectionMatrix);
     }

     function main() {
         const canvas = GLUtils.makeCanvasObject("myCanvas");
         const gl = GLUtils.makeWebGL(canvas);

         if ( !gl ) {
             alert ( "WEBGL 을 사용할 수 없습니다. ");
             return;
         }
         const cube = GLDataUtils.makeCubeData();
         const typeNum = 1;
         const program = GLUtils.createProgramByType(gl, typeNum);

         if ( !program ) {
             alert ( "WEBGL을 사용중 오류가 발생하였습니다. ");
             return;
         }

         const uniformArray = [
             {uniformName : "worldMatrix", data : TypedMatrixUtils.makeIdentityMatrix(4), dataType : 1, dataKind : 3, dataSize : 4, uLocation:undefined, transpose:true},
             {uniformName : "viewMatrix", data : TypedMatrixUtils.makeIdentityMatrix(4), dataType : 1, dataKind : 3, dataSize : 4, uLocation:undefined, transpose:true},
             {uniformName : "projectionMatrix", data : TypedMatrixUtils.makeIdentityMatrix(4), dataType : 1, dataKind : 3, dataSize : 4, uLocation:undefined,transpose:true},
             {uniformName : "uSampler", data : 0, dataType : 2, dataKind : 1, dataSize : 1, uLocation:undefined,transpose:false},
         ];

         const attributeArray = [
             {attributeName : "position", data : new Float32Array(cube.positions) , size: 3, dataType: gl.FLOAT, normalize:false, stride:0, offset:0, loc: undefined},
             {attributeName : "normal", data : new Float32Array(cube.normals) , size: 3, dataType: gl.FLOAT, normalize:false, stride:0, offset:0, loc: undefined},
             {attributeName : "colors", data : new Float32Array(cube.colors) , size: 4, dataType: gl.FLOAT, normalize:false, stride:0, offset:0, loc: undefined},
             {attributeName : "texCoord", data : new Float32Array(cube.textures) , size: 2, dataType: gl.FLOAT, normalize:false, stride:0, offset:0, loc: undefined},
         ];

         GLUtils.setUniformLocations(gl, program, uniformArray);
         const vao = gl.createVertexArray();
         gl.bindVertexArray(vao);

         GLUtils.setAttributeValues(gl, program, attributeArray);
         const indexInfos = { data : new Uint32Array(cube.indices), indexSize : cube.indices.length , indexType :  gl.UNSIGNED_INT, offset:0};

         GLUtils.setIndexInfos(gl, indexInfos);

         const gProgram = new GLDataUtils.GLProgram("programID");
         gProgram.initResource(gl, program, uniformArray );

         const gItem = new GLDataUtils.GLItem("itemID");
         gItem.initResource( gl, program, attributeArray, uniformArray, indexInfos, undefined, "worldMatrix");
         gItem.setLocalMatrix( TypedMatrixUtils.makeTranslateMatrix3D(1,5, -6));

         const gItem02 = new GLDataUtils.GLItem("itemID02");
         gItem02.initResource( gl, program, attributeArray, uniformArray, indexInfos, undefined, "worldMatrix");
         gItem02.setLocalMatrix( TypedMatrixUtils.multiplyMatrix(TypedMatrixUtils.makeTranslateMatrix3D(0,0,-8), TypedMatrixUtils.makeScaleMatrix3D(2,2,2)));

         gItem02.makeRotateAnimations(3,0.02,-1);


         gItem.makeRotateAnimations(1, 0.05, 1);
         gItem.makeRotateAnimations(2, 0.05, 1);
         //gItem.makeRotateAnimations(3, 0.05, 1);

         gItem.makePendulumAnimation(3, 0.005, 1, -2, 2);
         gItem.makeOrbitAnimations(3, 0.05, 1);

         gProgram.appendItem(gItem);
         gProgram.appendItem(gItem02);

         const plane = new GLDataUtils.BasicPlane('aa');
         const pData = plane.getCurrentData();
         const planeItem = new GLDataUtils.GLItem("planeItemID");

         const planeAttributeArray = [
             {attributeName : "position", data : new Float32Array(pData.positions) , size: 3, dataType: gl.FLOAT, normalize:false, stride:0, offset:0, loc: undefined},
             {attributeName : "normal", data : new Float32Array(pData.normals) , size: 3, dataType: gl.FLOAT, normalize:false, stride:0, offset:0, loc: undefined},
             {attributeName : "colors", data : new Float32Array(pData.colors) , size: 4, dataType: gl.FLOAT, normalize:false, stride:0, offset:0, loc: undefined},
             {attributeName : "texCoord", data :  new Float32Array(pData.textures), size: 2, dataType: gl.FLOAT, normalize:false, stride:0, offset:0, loc: undefined},
         ];

         const planeIndexInfos = { data : new Uint32Array(plane.indices), indexSize : plane.indices.length , indexType :  gl.UNSIGNED_INT, offset:0};

         planeItem.initResource( gl, program, planeAttributeArray, uniformArray, planeIndexInfos, undefined, "worldMatrix");

         planeItem.setLocalMatrix( TypedMatrixUtils.multiplyMatrix(TypedMatrixUtils.makeTranslateMatrix3D(0,0, -20), TypedMatrixUtils.makeScaleMatrix3D(20,20,20)) );
         gProgram.appendItem(planeItem)

         setProgramUniformValues(gl, gProgram);

         render(gl, gProgram);

         const maxTextureUnits = gl.getParameter(gl.MAX_COMBINED_TEXTURE_IMAGE_UNITS);
         const maxVertexShaderTextureUnits = gl.getParameter(gl.MAX_VERTEX_TEXTURE_IMAGE_UNITS);
         const maxFragmentShaderTextureUnits = gl.getParameter(gl.MAX_TEXTURE_IMAGE_UNITS);

         //alert (  maxTextureUnits + "\n" + maxVertexShaderTextureUnits + " , " + maxFragmentShaderTextureUnits );
     }

     main();
 </script>
소스에서 GLProgram GLItem 은 render 를 위한 데이터 묶음인데 물체를 여러개 그리고자 할 때 조금 편한게 구현하기 위한 부분입니다.
나중에 정리할 시간이 있을 때 자세히 기술 하고, 여기서는 texture 부분에 집중해서 정리해 보도록 하겠습니다.
위 소스는 기존 Shader를 통해 로딩하고 평면의 좌표에서 색상이 어떤 위치에 놓여 있는지를 확인하는 정도로 정리하면 될 것 같습니다.
그럼 다음에 Texture 를 어떻게 로딩할 까요 ?
Texture Loading 과정
앞선 소스에서 몇가지 변경을 해 보도록 하겠습니다.
가장 먼저 Texture 를 사용하기 위해서는 Shader 내용을 변경하여야 합니다. 변경된 Shader 는 다음과 같습니다.
texture uv 좌표를 받아 들이는 부분과, uniform sampler2D uTexture 사용자가 로딩한 texture 정보를 받아 들이고,
GL 의 내장 함수인 texture(uTexture,vTexCoord); 를 통해 보간된 색상값을 가져 오는 부분입니다.
     case 2 :
         vs = `#version 300 es
         uniform mat4 worldMatrix, viewMatrix, projectionMatrix;
         in vec3 position;
         in vec3 normal;
         in vec4 colors;
         in vec2 texCoord;

         out vec3 vNormal ;
         out vec2 vTexCoord ;
         out vec4 vColors;

         void main() {
             gl_Position = projectionMatrix * viewMatrix  * worldMatrix * vec4(position, 1.0);
             vNormal = normalize(transpose(inverse(mat3(worldMatrix))) * normal);
             vTexCoord = texCoord;
             vColors = colors;
         }
         `
         break;


         fs = `#version 300 es
         precision highp float;

         in vec2 vTexCoord;
         in vec3 vNormal;
         in vec4 vColors;

         uniform sampler2D uTexture;
         out vec4 fragColor;

         void main() {
             fragColor = texture(uTexture,vTexCoord);
         }
     `


     //  호출하는 페이지 에서
         const typeNum = 2;
         const program = GLUtils.createProgramByType(gl, typeNum);
처음 GL Program 을 구성할 때 Vertex Shader 에서 texCoord 를 전달하고, Fragment Shader 에서 uniform sampler2D uTexture 를 받아 texture 정보를 매핑한 후 , texture(uTexture,vTexCoord); 함수를 통해 uv 좌표로 부터 데이터를 fragment shader 에서 처리 할 수 있도록 전달하고 있습니다.
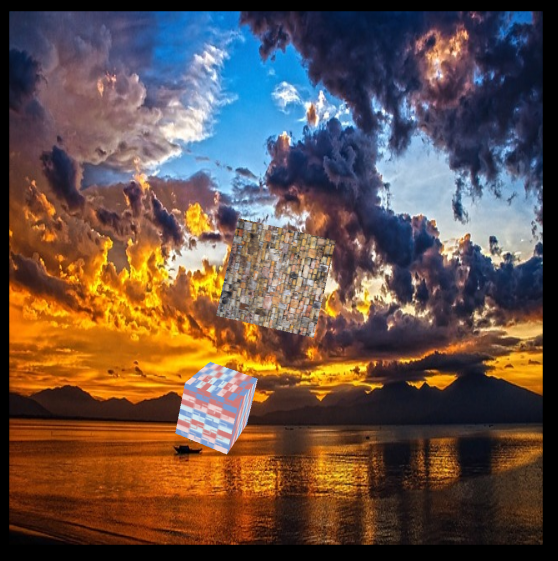
호출하는 페이지 에서도 Texture 를 사용 할 수 있도록 다음과 같은 코드가 추가 되어 있습니다. loadGLTextureData 는 비 동기적으로 이미지르 파일을 읽기 때문에 처음 로딩할 때 미리 작은 이미지를 갖고 있다가, 이미지 로딩이 완료 되면 정상적으로 texture 이미지로 그려 주고 있습니다. three.js 를 만든 분이 구성한 webgl2 site 에서 참조한 내용인데 작은 이미지 로딩 , 고품질 이미지 로딩 등으로 변형이 가능할 것 같습니다.
      function main() {
         ...

         const url01 = "/imgs/fabric.jpg";//"/imgs/8k_earth_daymap.jpg";
         const url02 = "/imgs/wall.jpg";
         const url03 = "/imgs/sea01.jpg";
         const textureInfos = {
             texture : GLUtils.loadGLTextureData(gl, url01),
             index : 0,
             uTextureName : "uSampler",
         }

         const textureInfos02 = {
             texture : GLUtils.loadGLTextureData(gl, url02),
             index : 0,
             uTextureName : "uSampler",
         }
         const textureInfos03 = {
             texture : GLUtils.loadGLTextureData(gl, url03),
             index : 0,
             uTextureName : "uSampler",
         }

         ...
         gItem.initResource( gl, program, attributeArray, uniformArray, indexInfos, textureInfos, "worldMatrix");
         ...
         gItem02.initResource( gl, program, attributeArray, uniformArray, indexInfos, textureInfos02, "worldMatrix");
         ...
         planeItem.initResource( gl, program, planeAttributeArray, uniformArray, planeIndexInfos, textureInfos03, "worldMatrix");

         ...
      };


      export const loadGLTextureData = ( gl, url ) => {
         const texture           = gl.createTexture();
         const level             = 0;
         const internalFormat    = gl.RGBA;
         const width             = 1;
         const height            = 1;
         const border            = 0;

         gl.bindTexture(gl.TEXTURE_2D, texture);
         gl.texImage2D(gl.TEXTURE_2D, level, internalFormat, width, height, border, gl.RGBA, gl.UNSIGNED_BYTE, new Uint8Array([0, 0, 255, 255]));

         CanvasUtils.loadImageFromURL(url).then( image => {
            gl.bindTexture(gl.TEXTURE_2D, texture);
            gl.texImage2D(gl.TEXTURE_2D, level, internalFormat, gl.RGBA,gl.UNSIGNED_BYTE, image);
      //      gl.texParameteri(gl.TEXTURE_2D, gl.TEXTURE_WRAP_S, gl.CLAMP_TO_EDGE);
      //      gl.texParameteri(gl.TEXTURE_2D, gl.TEXTURE_WRAP_T, gl.CLAMP_TO_EDGE);
            gl.texParameteri(gl.TEXTURE_2D, gl.TEXTURE_MAG_FILTER, gl.LINEAR);
            gl.texParameteri(gl.TEXTURE_2D, gl.TEXTURE_MIN_FILTER, gl.LINEAR_MIPMAP_NEAREST);
            gl.generateMipmap(gl.TEXTURE_2D);
            gl.bindTexture(gl.TEXTURE_2D, null);
         });
         return texture;
      };
여러 이미지를 로딩할 때 sampler 를 여러개 구성해야 하지 않을까 생각해 보았습니다. 두개 이상의 texture 를 혼합하거나,
다른 특수 효과가 필요한 경우에는 그렇게 구성하여도 괜찮지만, opengl guide 에서 active texture 가 0 이고 sampler 가 하나일 때
동시에 여러 texture 를 구성해서 사용할 수 있다고 명시 되어 있습니다. 사용전 해당 물체가 사용할 textuer 를 binding 하면
그 값으로 매핑이 되는 구조 입니다.
효율화를 고려 한다면 해야할 부분이 많이 있지만, texture 를 어떻게 사용하는지 기본적인 내용을 정리해 보았습니다.
여러 물체를 그리는 방법등은 향후 시간이 될 때 정리해 보고자 합니다. ^^